Smart Ceiling Fans Support

Smart WiFi Ceiling Fans - Frequently Asked Questions

How can we help you?


GENERAL ELECTRICAL WARNING

Installation or modification of any electrical products requires knowledge of electrical systems. If you are not qualified, do not attempt to install, remove or modify your electrical product; instead, contact a qualified electrician. Risk of fire or electrical shock.


Alexa Smart Ceiling Fans

Certified for Humans is smart home made easy. Certified for Humans devices meet Amazon’s criteria for being surprisingly simple to use. They are easy to connect to Alexa and highly rated by customers. Automatic software updates make them dependable and maintenance-free.

Learn more about Certified for Humans


  1. Download the Alexa app by going to the App Store and searching “Alexa app”. Choose Alexa.

  2. Links available here:

Option 1: Voice Set Up

  1. Install your new smart ceiling fan, then power up an Alexa-enabled device like the Echo, Echo Dot, or your Alexa app.
  2. Say, “Alexa, discover devices.”
  3. Follow the prompts, and you’ll be using your voice to run your ceiling fan in no time.

Option 2: Alexa app Set Up

Go to the Alexa app on your smartphone and follow the new device setup instructions.


Option 3: Bar Code Set Up (BCS)

See "How do I use my ceiling fan's QR code for Barcode Setup (BCS)?"


Option 4: User Guided Setup (UGS)

See "How do I set up my ceiling fan if the QR code for Barcode Setup (BCS) is damaged or missing?"

There are two QR codes for BCS.

One is on the back of the battery cover of the handheld transmitter, and the second is on the device control receiver installed above the fan inside the ceiling canopy.

While Wi-Fi is connected, scan the QR code found on the back of the handheld transmitter to add the device to the Alexa app.

Utilize the User Guided Setup (UGS) to add the device to the Alexa app. While in the Alexa app, in the "Connect your Westinghouse Lighting fan to Alexa" screen, navigate to the "DON'T HAVE A BARCODE" button, and power ON at the wall switch (or at the circuit breaker panel).

Hold the fan speed 2 & fan speed 3 buttons for 5 seconds on the handheld transmitter. Wait for the fan light to turn ON at 50% brightness, making the fan discoverable on the Alexa app.

Yes, when using the same Alexa acount, multiple users can control the ceiling fan via the Alexa app.

Factory Reset allows the user to remove the smart fan from the Alexa app.

A factory reset erases the Wi-Fi setting and the user data (such as the smart fan settings, Wi-Fi settings, etc.) from the Alexa app.

For Factory Reset: At the wall switch or circuit breaker panel, turn off and then turn on the power to the fan. Within 30 seconds, press and hold the FAN POWER and LIGHT POWER buttons located on the handheld transmitter for 5 seconds. Wait for the fan light to turn off, then blink twice and turn on at 100%.

  1. Open the Alexa app on your phone and navigate to the More tab.
  2. Click on the Help & Feedback option, where you will be directed to options for chat support and voice call support.
  1. The direct link for opening customer contacts: https://www.amazon.com/gp/help/customer/contact-us

    If the direct link does not work:

  2. If you have an Amazon account, please log in to Amazon.com.
    1. After login, click "Customer Service".
    2. Click on "Digital Services and Devices" Support link.
    3. Scroll down to the bottom and click the "Contact Us" or "Start a Chat Now" link under Talk to an Amazon Associate.


[Return to top]


Bond Smart Ceiling Fans


  1. Download the Bond Home app by going to the App Store and searching "Bond Home".

  2. Choose Bond Home, not Bond Bridge.

  3. Links available here:

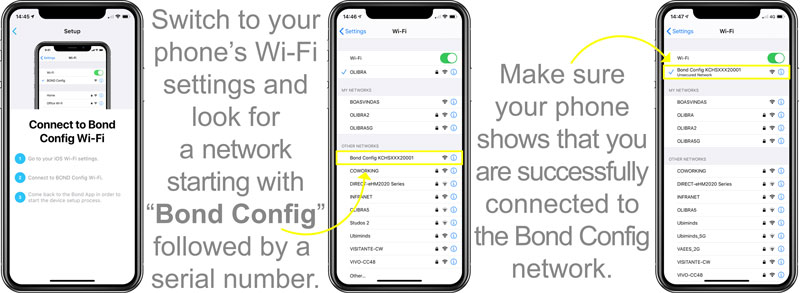
STEP 1: CONNECT & CONFIGURE TO WI-FI


STEP 2: WELCOME SCREEN


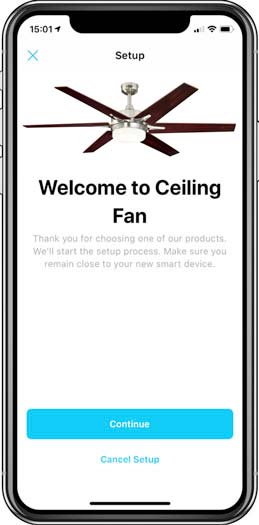
  1. You now will see a picture of your ceiling fan model and see a model-specific welcome message.
  2. Tap the Continue button.


STEP 3: SET LOCATION & NAME

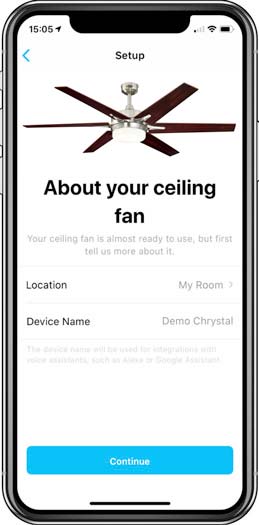
Note: The Device Name will be used on Alexa, Google Home, and other integrations. So pick a name that is easy to pronounce.

  • These settings can be easily changed later.
  • You can set a custom location by scrolling down the list and choosing Other.


STEP 4: DEVICE CONTROL SCREEN

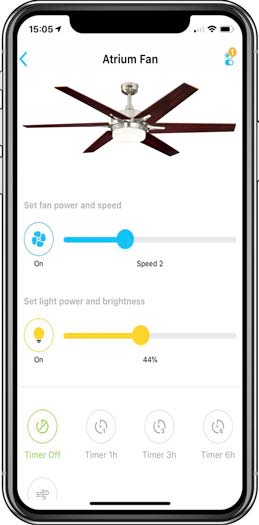
After tapping on the device, you will see the device control screen.

You can adjust the fan speed, light brightness, set timers, and enable breeze mode. Fans with Smart Reverse can be set into Summer or Winter directions.


The Factory Reset will erase all fan settings, schedules, and disconnect from your Wi-Fi network. However, the fan will remain paired with the remote control.

  1. Turn off the breaker or wall switch
  2. Turn the breaker or wall switch back on.
  3. Immediately press and hold the Fan Speed 1 button on your ceiling fan's remote control for 20 second, or until the ceiling fan light flashes five times. (Note: You must start holding the button within 15 seconds of turning the braker or wall switch back on.)

To navigate to the help section of the app, tap on Settings, then on Help Center.

From here, you can choose from the following options:

  • Search Knowledge Base
  • Open a Support Ticket
  • Live Chat with Support Team


[Return to top]


Product Performance

A small amount of movement while the ceiling fan is operating is normal. However, if the movement is noticeable, it is usually caused by either unbalanced blades or the fan not being securely attached to the ceiling. Please check the following troubleshooting tips.

Unbalanced blades:

  • All blades are screwed firmly into blade holders.
  • All blade holders are tightened securely to the motor.

Ceiling fan not securely attached to ceiling:

  • The canopy and mounting bracket are tightened securely to ceiling joist.
  • The down rod ball is properly seated into the mounting bracket.
  • The set screws in the yoke or down rod coupling are tightened to the down rod.
  • The down rod ball set screw is tightened to the down rod.

If ceiling fan movement is still noticeable, try interchanging two adjacent (side-by-side) blades to help redistribute the weight and possibly result in smoother operation.

Clicking sounds are most often caused by a loose blade bracket and/or loose blade holder screws. Please check the following troubleshooting tips:

  • All blade bracket and blade holder screws are tightened.
  • The canopy screws are tightened.
  • The down rod ball is not spinning.
  • No obstruction between the down rod ball and the mounting bracket.
  • The down rod and the down rod yoke screws are tightened.
  • The glass is secure and fully engaged – either by tightening the screws holding the glass shades or by securely twisting the glass shade into place.

All ceiling fans produce a slight humming sound when in use. Loud humming is most often caused by resonance or interference.

Resonance is caused by large surface areas, such as ceilings, vibrating and amplifying the sound produced by the ceiling fan. There should be a slight gap between the motor housing and the ceiling. Common causes of resonance are:

  • Contact between the housing and the ceiling. (Most common)
  • The mounting bracket or the junction box coming in contact with the ceiling. (Note: There should be a slight gap around the perimeter of the junction box.)
  • A ceiling with a stucco or rough finish. This is most common with hugger ceiling fans and can be smoothed by sanding the stucco where the canopy meets the ceiling.

Interference can be caused by the connection between a variable-speed control (such as a slide or dial) and the motor of the ceiling fan. Please check that the variable-speed control that you are using is designed for use with ceiling fans.

Check that your reverse switch is not stuck in the center, as this will keep the fan from turning. If this is not the cause, please contact us for further assistance. It is helpful if you can provide as many details as possible, such as any humming sounds or slowing of speed before the fan stopped functioning.

The cause could be either the light bulb or the wiring above the canopy. First, check to see if the light bulb is working. If this does not resolve the issue, drop down the canopy of the ceiling fan and check to make sure that the blue wire from the receiver to the fan wire is securely connected.

Typically, this issue is caused by interference with another fan remote or transmitting device, such as a garage door opener.

To resolve this issue, turn off the power to the fan and then turn it back on. Press "Fan Off" button for 5 seconds to pair the remote with your ceiling fan.

Power Button on remote


[Return to top]


Installation

All receivers should be installed with the curved side facing down from the ceiling. See image below.

This side down - receiver


[Return to top]


Remote & Wall Controls

If your ceiling fan remote control has stopped working, first check the battery. If this does not resolve the issue:

  • Turn off the electricity to the ceiling fan and then turn it back on.
  • Press POWER button for 5 seconds to pair the remote with your ceiling fan.
POWER button on remote

Please note, it's always best to refer to the instruction manual for your specific ceiling fan. Click here to view our collection of smart ceiling fans and corresponding instruction manuals.

Alternatively, you can search for your smart ceiling fan on our website by following these steps:

  1. Type the item number or product name into the search bar on our website.
  2. Select your ceiling fan from the search results to open the product page.
  3. On the product page, select the blue INSTRUCTIONS box to open the specification sheet.

If your ceiling fan has a down rod, you can install a remote control on a cathedral or sloped ceiling using our cathedral ceiling fan canopy kit (available in brushed nickel or oil rubbed bronze). This accessory provides the additional room needed in the canopy to accommodate both the receiver and the slope of the ceiling.

NOTE: Our cathedral ceiling fan canopy kit is not compatible with hugger ceiling fans or ceiling fans that do not have a down rod.


[Return to top]


Parts & Replacements

First, we apologize that your experience so far has not been what we strive for. If you are within the return window of the specific retailer from which you purchased the ceiling fan, we always recommend you work with the retailer directly to return/exchange the item within their company policy. This typically allows for the fastest and most efficient replacement of the item. If you are no longer within the return window, please contact us and we will be happy to assist you.


[Return to top]


Additional questions or other issues?

Please contact us.


[Return to top]